
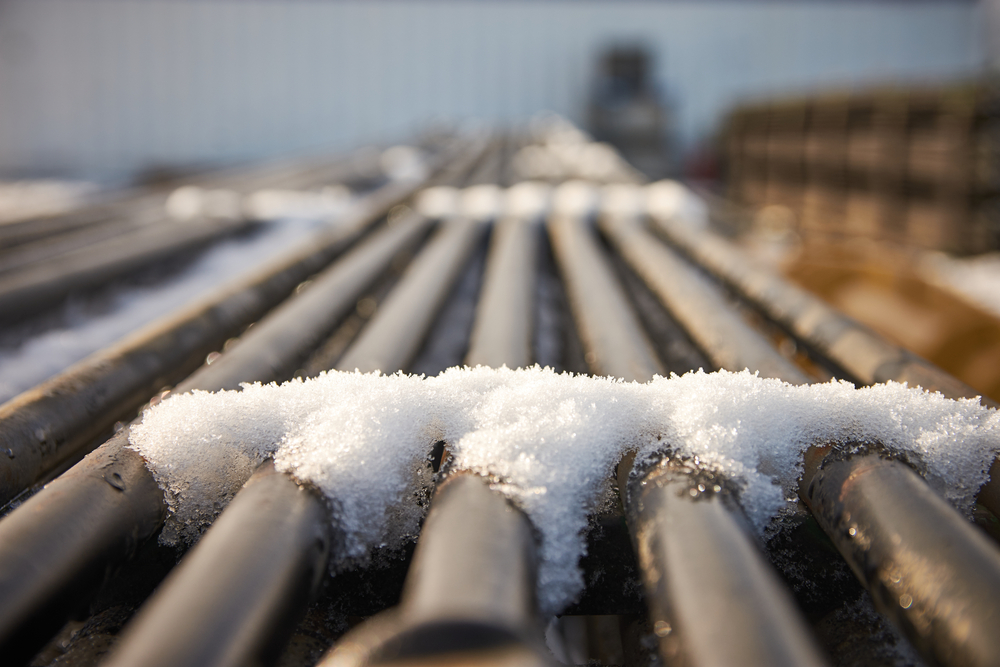
Cold snaps have a way of finding the weakest point in any home’s plumbing system, usually at the most inconvenient moment imaginable. A pipe runs along an exterior wall; overnight, the temperature drops below 20 degrees. The water inside expands as it freezes, and suddenly the morning shower delivers nothing but a slow trickle, followed by complete silence. Knowing how to thaw frozen pipes properly matters enormously in this situation, since the wrong approach can turn a manageable inconvenience into a flooded basement and a five figure repair bill within minutes. The pipe walls weakened by ice expansion stay vulnerable to bursting throughout the thawing process, which means every step taken in the next hour either resolves the problem safely or escalates it into something much worse. Most homeowners panic and grab the nearest heat source they can find, often making the situation significantly more dangerous than the original freeze ever was. The next sections carefully walk through the correct sequence, with clear guidance on what actually works and which common approaches pose real risk.
1. The first moves to make before applying any heat
The very first step after discovering frozen pipes has nothing to do with thawing the ice itself. Locate and shut off the main water valve to the house immediately, since this single action prevents catastrophic flooding if a pipe has already cracked from ice expansion or bursts during the thawing process. Open the affected faucet to relieve pressure in the pipe, since the trapped water and ice need somewhere to expand as they thaw. Identify which specific pipe is frozen by checking other faucets in the house, since the location of the freeze tells you where to focus heat application during the next phase. Document any visible damage with photos at this stage, in case insurance claims become necessary after the situation resolves.
2. Safe heat sources that get the job done right
Once water shutoff is complete and the faucet is open, several safe heat sources work effectively without creating fire risks or steam pressure problems. Electric heating pads wrapped around the pipe deliver controlled even heat that thaws ice gradually without thermal shock to the pipe walls. Hot water soaked towels applied to the frozen section provide gentle warmth that works particularly well on copper pipes accessible from inside the home. Space heaters positioned several feet from the pipe raise the ambient temperature in the area, which is useful for pipes hidden inside walls where direct contact isn’t possible. Portable hair dryers deliver focused heat to accessible pipes, though they require constant attention and careful technique to avoid overheating any single section. Start thawing closest to the faucet and work backward toward the freeze location, allowing melted water to drain as the ice releases.
3. Handling situations where no water flows at all
A common emergency scenario involves frozen pipes with no water flowing anywhere in the house, which signals that the freeze has affected a main supply line rather than just a branch line to a single fixture. Check the meter or shutoff valve area first, since pipes near these locations are directly exposed to outside temperatures in many home configurations. Crawl spaces, unheated basements, and exterior walls are the most common freeze points in residential plumbing systems in cold-weather regions. If the main supply line has frozen, professional service becomes the safer path forward rather than continued DIY thawing attempts, since these larger pipes carry more water under more pressure than branch lines. Maintain heat in the home throughout the diagnostic process, since dropping temperatures during the work will only make the situation worse for any pipes still flowing normally.
4. Stopping the problem before it starts in cold climates
Smart prevention saves enormous trouble compared to dealing with freeze emergencies once they occur. The full picture of preventing frozen pipes in Colorado starts with proper insulation around all vulnerable pipe runs, particularly those along exterior walls and through unheated spaces. Foam pipe insulation sleeves wrap easily around accessible pipes and provide significant protection against freezing at minimal cost. Heat tape provides active heating for pipes in particularly vulnerable locations, with thermostatically controlled versions that activate automatically when temperatures approach freezing. Keep cabinet doors open under sinks on exterior walls during cold snaps, allowing warm room air to reach the pipes hidden behind. Let faucets drip slightly during extreme cold weather, since moving water freezes significantly more slowly than standing water in pipes.
5. The specific techniques and tools that actually work safely
A practical look at using a hairdryer to thaw pipes rounds out the discussion of focused-heat application techniques homeowners can safely use on accessible plumbing. Set the dryer to medium heat rather than high, since concentrated extreme heat can damage pipe walls already stressed by ice expansion inside. Move the dryer continuously along the frozen section rather than holding it in one position, ensuring the heat is evenly distributed across the affected length. Maintain a distance of 8 to 12 inches between the dryer nozzle and the pipe surface to prevent thermal damage to surrounding materials. Never use propane torches, kerosene heaters, or open flames of any kind on frozen pipes, as these heat sources pose fire risks and can cause sudden steam pressure that instantly ruptures weakened pipe walls. This careful, gradual approach takes longer but delivers consistently safe results across thousands of successful thawing situations.
Conclusion
Frozen pipe situations resolve safely when homeowners follow the correct sequence calmly rather than reacting in panic with whatever heat source is closest at hand. The water shutoff and faucet opening steps prevent the worst-case outcomes regardless of how the thawing process unfolds afterward. Gentle, controlled heat applied gradually delivers consistent results without the risks of extreme heat or open flames. Build prevention measures into your winter routine, since preventing the freeze entirely beats every thawing technique available afterward. Professional help is worth the call when the situation exceeds the capabilities of homeowner-level techniques.
“Frozen lines, no water, dripping ceilings. Call Doyle Plumbing at 720-638-8839 today, our team responds fast with safe thaws and lasting repairs.”
FAQs
Q1: What should homeowners in Denver, CO, do first when they discover frozen pipes?
Shut off the main water valve immediately, then open the affected faucet to relieve pressure inside the pipe system. These two steps prevent catastrophic flooding if a pipe has already cracked due to ice expansion during the freeze.
Q2: How much does emergency frozen pipe service typically cost in Colorado?
Most emergency service calls in this region run between $185 and $425, depending on the time of day, accessibility of the affected pipes, and the extent of any damage requiring repair. After-hours and weekend calls carry additional premiums of $50 to $150 over standard business hour rates.
Q3: When should homeowners in Colorado Springs, CO, call a professional service rather than attempting DIY thawing?
Call a professional when no water flows anywhere in the house, when pipes are hidden inside walls and are inaccessible for direct heat application, or when visible damage suggests a pipe has already cracked. Sooner is better than later in any freeze emergency situation.
